Drafters Strategy:: SURVIVAL Edition
WRITTEN BY: MIKE JOHNSON (@MJOHNSON_86)
This year, for the first time, Drafters is having a “Survival” contest. The structure is unique and presents a much different challenge and approach than any other type of Best Ball contest currently available. It is a contest that has one leaderboard for all teams drafted in it, just like the other Drafters cumulative scoring contests, but the leaderboard resets each week. This structure combines the concepts of a couple of different types of games.
First, Underdog has the “Eliminator” contest, but that is a structure where the top 6 of 12 teams from your initial draft advance and then you have head-to-head matchups every week until a Week 17 three person final. The Eliminator structure promotes building a solid team with a high floor and being sound enough to win on a weekly basis with only one opponent per week, but there is a ton out of your control. This creates a very volatile and high variance situation where who you get matched up with each week has just as great of an impact on your outlook as how your team performs. It is fun, without a doubt, but the level of variance is simply so high that it becomes extremely difficult to predict or strategize for. Everyone complains about “pod luck” during the playoff weeks of regular season contests on Draftkings and Underdog – well the Eliminator is basically 15 weeks of needing some “pod luck”.
Second, the Drafters full season cumulative scoring contests are designed in a way that you are looking for extreme outlier outcomes and require us to think deeply of how to systematically turn the math in our favor and give ourselves the highest chances of things coming together just right to reach 2,800 points over 17 weeks. That requires building in certain ways and having a certain amount of risk and a mindset to carry us to the top of a very tall mountain.
The Drafters SURVIVAL contest combines those two ideas. The weekly nature of advancement makes it so that we do not need to hit everything perfectly on our roster and push the limits in pursuit of 2,800 points. However, the nature of the contest with one leaderboard for all contestants smoothes out the variance and takes away the weekly “luck” aspect. As much as people complain about “pod luck”, it is also something that often works in our favor. The luck is removed here, and each week during Weeks 1 through 14 the top 75% of contestants advance, then the top 50% advance in Week 15 and again in Week 16, then there is a 125 person final in Week 17. That is a lot to digest. Here are the things we must consider strategically within this contest::
1 – Advancement Rate
As with anything, the best way to analyze this is to break things down into smaller pieces. First of all, in playoff format contests advancement rate is the most important thing. You have to be alive for anything else to matter. This has been studied and discussed across the industry for the last couple of years and the bottom line is advancing boosts your EV more than anything else because it gives you a seat at the table. This is also true for Drafters SURVIVAL, but in a slightly different way. Obviously we need to find the best way to advance on a weekly basis, which means we can never finish in the bottom 25% in any week. This is incredibly relevant, because that threshold is a lot tougher than people realize. I finished 7th in the Drafters Main Event in 2023 with a roster that had 2,747 points over the 17 weeks. However, that roster scored only 112 points in Week 1 and would almost certainly have been eliminated right away in the SURVIVAL format.

2 – Finals Payouts
We can’t overthink things in terms of stacking for Week 17. Yes, that is where “all the money is”, but it is only 125 teams which is the DFS equivalent of a very small field tournament. Team stacks are fine, because they can help carry you throughout the season if you are right about an undervalued offense, but worrying about the game stacks is too deep in the weeds and focusing on the wrong things, in my opinion. Especially when considering the small field size in the Finals, it simply isn’t a necessary thing to be altering your draft strategy. If you happen to get players who correlate in Week 16 or 17 simply by chance that is great, but the primary focus should be our Drafters strategies adjusted for this format.
3 – Fighting The Urge For “Floor”
The initial tendency and thought process for many when they see this type of contest is to think that it is about “safe” players with high weekly floors and predictable usage. However, this won’t last you for 17 weeks. There are 8 positions on your roster and at some point your focus on “floor” is going to hurt you in a major way where you just end up with a bunch of players scoring 8 to 12 points and scoring 110 to 120 points total and ending your season. The idea of “Usable Weeks” can quickly be erased by focusing on certainty and stability in this type of contest because it opens you up to situations where you aren’t adding many points above replacement at any position. Your 20 players might combine for 220 points but your team itself scores only 120. This approach also opens you up to being on the wrong side of variance when a high scoring NFL week hits. Your “solid” roster might put up 135 points in Week 12, but at that point in the season the field has been whittled down quite a bit to stronger rosters and if fantasy scoring goes wild that week then the “top 75%” threshold is probably going to be pretty high.
SURVIVAL Strategies
So the idea here is that advancement is the most important thing, but we want to focus on it without becoming obsessed with stability. We still need outlier outcomes, just not the same type of outlier that the full season contest entails. Our roster must not have any low floor type of weeks, but individual players can. And stacking up teams can be a great strategy, but we can’t let ourselves get consumed with Week 17 matchups and correlations. Got it? Ok, good. Now here are some ways we can do that::
SURVIVAL STRATEGIES
1. Sacrificing TWO Silos
There is a whole strategy article about “Sacrificing A Silo” for the regular Drafters contests where I go deep in the weeds about how and why it is a solid strategy. The basic idea is to take a high quantity of dart throws at one specific Silo, hope it works out, and be ahead of the game with a much stronger roster at your other seven Silos. However, in that specific format it is almost impossible to take that approach on multiple positions because it significantly limits your high end outcome over the course of 17 weeks. The SURVIVAL format, however, makes this a more viable option. Take, for instance, the RB2 and TE positions. We want 300+ and 250+ points from those Silos in regular Drafters contests to give us a reasonable shot at 2,800. But for this contest, what if we merely got 225 and 175 points from each of those Silos? That is an average of only 13 points per week from the RB2 Silo and 10.3 points per week from the TE Silo. Seems reasonable enough. That means your other 6 positions (QB, RB1, and the 3 WR’s and FLEX) need to be getting you about 120 points every week, or 20 points per week from each position. Sound familiar? (That is the exact target we have for all 8 positions in the mathematical breakdown for regular Drafters contests). The idea here is simple, pick a couple of spots where you take your lumps and hope you can get double digits out of them each week, with the side effect being you have an extremely strong roster everywhere else that should have weekly ceilings that can keep you afloat in the top 75% of rosters.
2. Supercharging A Silo (or “Position Maxxing”)
Similar conceptually to “Sacrificing A Silo” or “Sacrificing Two Silos”, but taken from a different lens. The idea here is to go full throttle at either RB or WR, to an excessive amount, and supercharge your output from those Silos. While this would be a very poor and wasteful approach in a regular Drafters contest that would essentially guarantee you can’t have a high finish, the idea in SURVIVAL is that stacking up so many elite players at either position would give you a high cumulative floor from the position – and the rest of your roster would be able to contribute enough points to keep you moving along. Here are two draft boards where I took this approach, one at RB and one at WR::
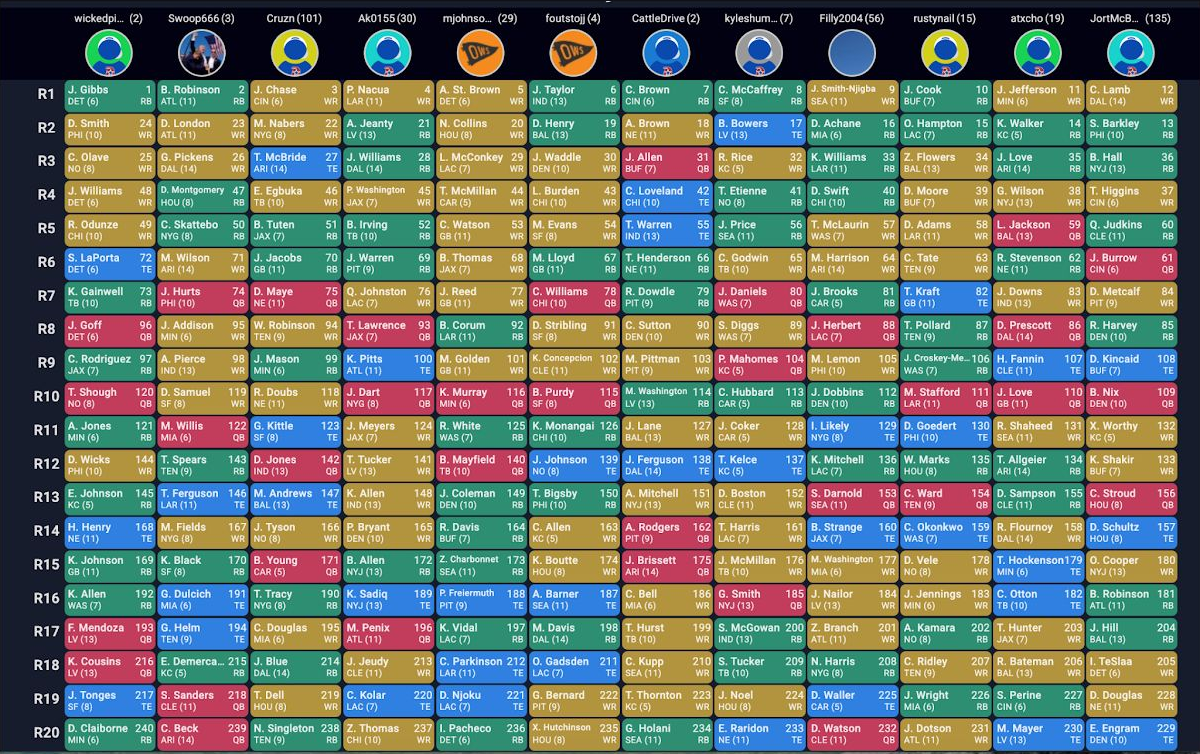
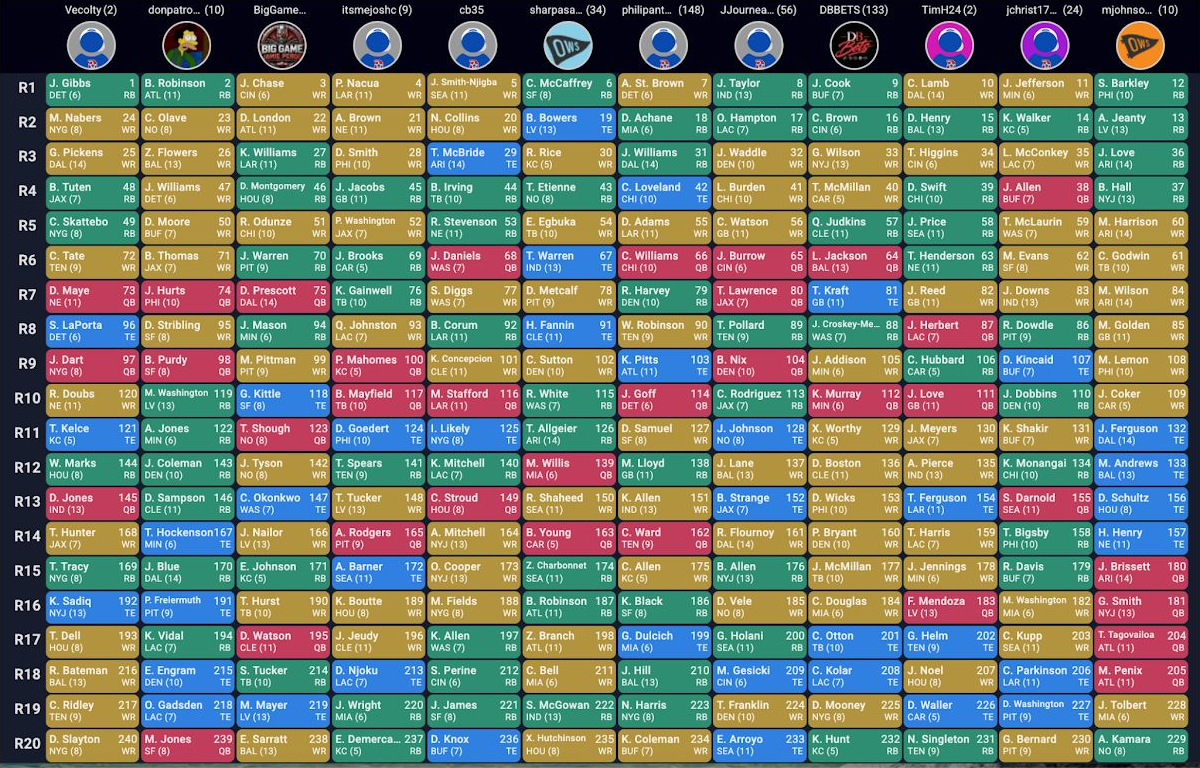
You can see in the first example from the 12-slot I took an RB with each of my first four picks. Those are all extremely talented RBs who could score 25 to 30 points in any given week and all have clear paths to top-10 seasons at their position if they stay healthy. The idea here is I get 60-70 points per week from those players at RB, RB, and FLEX combined. Then I need another 60-70 from my other five positions. You can see on that roster I also “sacrificed” the QB Silo with four late picks.
In the second example, from the 5-slot, I started with seven straight WRs. Again, this level of ignoring RB for the first 90 picks of the draft would be untenable in regular Drafters formats in 2026 – especially without getting a high end option at QB or TE. However, in the SURVIVAL format our goals change. Seven WRs with high weekly ceilings gives me a very high cumulative floor for the positions/silos they occupy. Idea here would be most weeks can we get 70-80 points from those four spots – then scrape by with enough from the other four spots.
3. Bye Week Strategies
The bye weeks are always a contentious spot in Best Ball. There are a few ways you can go with how you approach them. Here are the various ways I think about them and for each draft I may approach them differently::
- Balanced:: You can try to spread them out so your roster is always slightly below full capacity from Week 5 to 14, but rarely if ever at full strength. This reduces your chances of tanking in a given week, but leaves you slightly susceptible to depth issues in any given week as you are basically always down a man or two.
- Bottlenecks:: Rather than balancing things out, you can go hard at certain bye weeks. The idea here is that you are selectively increasing your variance on one or two specific weeks. If you select eight WRs and four of them have Week 11 byes, you are putting a ton of pressure on your other WRs during Week 11 to have at least decent production to advance. If you survive the bottleneck, you have an advantage on the field with a deeper roster in all the other weeks.
- Backloading:: You can try to backload the byes and prioritize selecting players with double digit bye weeks. This can help you advance through the early portion of the season with a full roster for the first 9 weeks while others miss key players, making staying above the Mendoza Line of top 75% very attainable. However, it also makes your roster most vulnerable later in the season when, in theory, the remaining teams will be the strongest. The other potential benefit to this concept is it gives your late round selections that may have high “contingent” value time for their roles to ascend.
- Frontloading:: Just the opposite of backloading. Take primarily players who have byes in Weeks 5 through 8. Your team will be at full strength during the later weeks against tougher competition and you can make your late round picks, who you will have to rely on during those earlier weeks, players whose roles are more stable and predictable during the early portion of the season. It opens you up to an earlier exit and missing the money, but could strengthen your chances in later weeks when the field gets stronger.
4. Injury Discounts // Complementary Players
Because you can be knocked out in Week 1, most people are dinging the players whose statuses and/or roles are in question early in the season. However, early in the season there are less injuries across the league and other players are easier to project. Take, for instance, Alvin Kamara and Isiah Pacheco. They are their team’s RB2 and probably have some standalone value within their offenses once on the field, but both are consistently going in the 200’s in this format because they could be zero’s the first 2 to 4 weeks. But what if you put them on a roster with a couple of stud RBs that have double digit bye weeks? You don’t want/need Kamara or Pacheco to contribute on that roster the first few weeks anyways, but they could be scoring meaningful points in November when you need them. This is just one example, but something we should consider when building our rosters for SURVIVAL. Which players is the field docking in this format for things that don’t actually effect how valuable they are or could be?
5. Rankings Adjustments
Best Ball rankings and ADPs are based on the overall idea of “standard” contests and the risks and expectations over the course of a season. SURVIVAL contests start in Week 1 with elimination, however, so the player evaluations need to change. Christian McCaffrey is a top-3 “in a vacuum” option as long as he is healthy. He is starting the year healthy. Jadarian Price is a 5th or 6th round pick because of worries that he splits work heavily with Zach Charbonnet in the second half of the season. But to start the year, he is clearly their top RB option. Kirk Cousins is probably going to be the Raiders starting QB for the start of the season and who knows when that ends. He goes in the last couple of rounds, if at all, in SURVIVAL drafts. Just a couple of examples of things we should be considering when drafting in this format.